 Skip to content

It’s somehow still January, and we know there’s one thing on your mind: PLANNING! Luckily for you, Rocketbook has a collection of different out-of-this-world planners to get any planning situation under control. Choose from the Everyday Planner for a customizable planning experience, the Academic Planner for school-related needs, the Panda Planner for ultimate goal-setting, or the Fusion or Fusion Plus for a little bit of everything. Bottom line: we’ve got you covered in the planner department.
We’re not going to lie–we know most people use Google Calendar in addition to their Rocketbook planner. Although there’s no formal Google Calendar integration within the Rocketbook app at the moment, there are several ways you can use any Rocketbook planner in tandem with Google Calendar. Keep reading to learn a few basic tips (and one extreme pro-tip) for how to use Google Calendar with Rocketbook.
Tip #1: Day-by-Day Planning
If you’re the type of person who likes to update your Rocketbook planner every single day so it’s as current as possible, this tip is for you.
- Use Google Calendar as your main place for long-term planning, adding in events and schedules as you learn of them. This way, you’re always able to look months ahead on your laptop or phone and know what that time frame looks like.
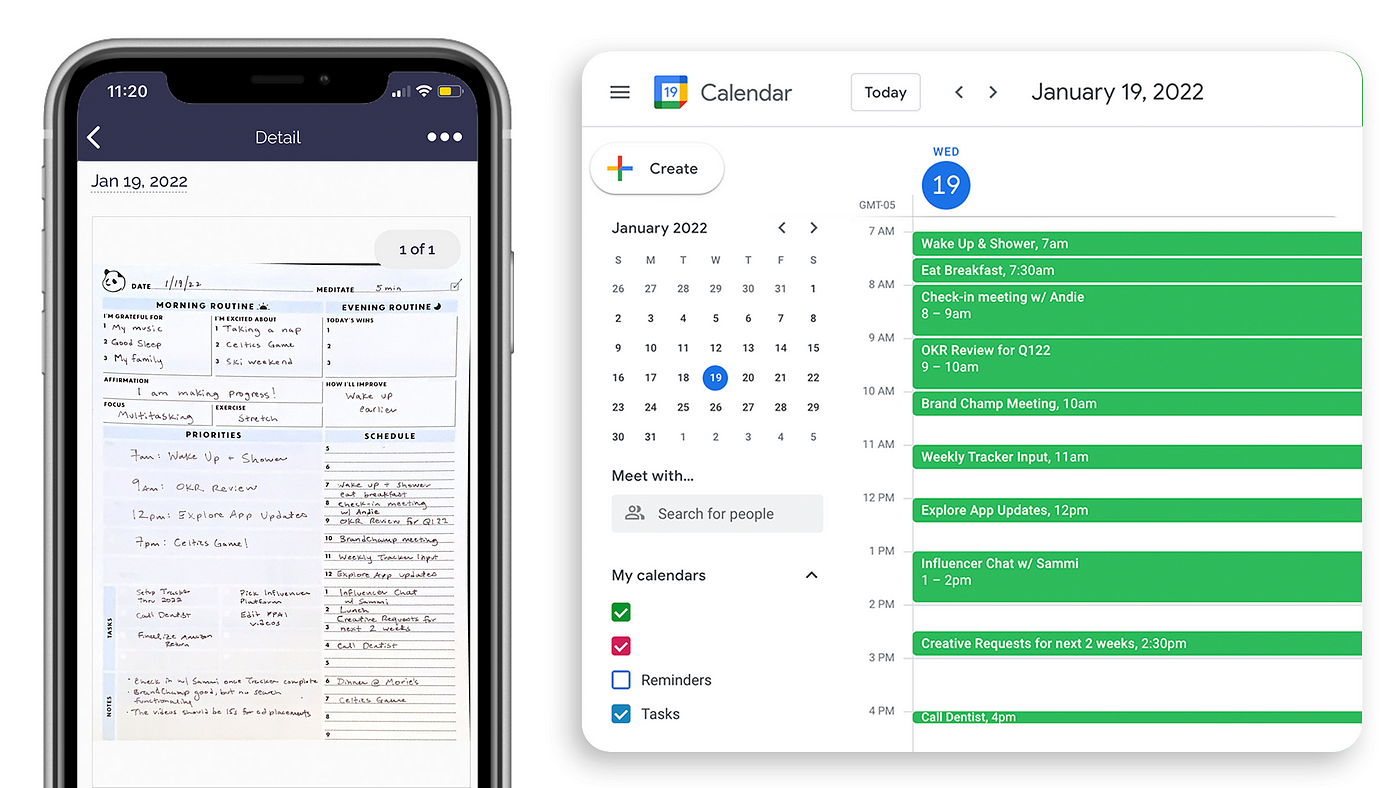
- This is where your Rocketbook planner comes in: every evening, look at your Google Calendar for the next day and copy all the appointments, reminders, and events into your Rocketbook planner. While you’re doing this, add more detailed notes, plans, and to-do lists–details that your Google Calendar might not have. On the day of, every event will be accessible in your Rocketbook planner, but you’ll still receive digital notifications from Google Calendar, if necessary. Sounds like a win-win to us.
Benefits of Tip #1
“Why would you write everything down in your planner if it’s already in your Google Calendar?”, you ask. “There’s actually several reasons why this method is beneficial for you”, we answer.
- Strong Memory: All of the events for the day ahead will be fresh in your brain because you’re copying it all down the night before. You might even be able to go through your day without your planner or your phone because you know it all by heart (we don’t recommend that).
- A Squeaky Clean Planner: Because you’re adding things in one day at a time, you can erase outdated planning pages or easily alter any changed plans.
- Planner Sleepovers: An alternative option is to sleep with your Rocketbook planner under your pillow every night to wake up and immediately write in all of your GCal events–because why not?
Tip #2: Weekly All-In-One Planning Sesh
If sleeping with a planner under your pillow sounds uncomfortable to you (and if you prefer to do your planning in bigger spurts), this tip will be better for you.
- To save time, plan your upcoming week on Sundays in both Google Calendar and your Rocketbook planner. Sit down with some coffee (or tea), a cozy blanket, a computer, and a planner. Fill out your schedule for the week in both places.
- You might have a few notes or appointments scribbled in your planner or added to your Google Calendar already, but take this time to get your weekly plans updated and in sync in both calendars.
Benefits of Tip #2
- Customization: Not sure if planning on a weekly basis is right for you? Use the basics of this method but in monthly or fortnightly (is that a word?) spurts. Do this every 3 days, or every 13 days–it’ll work no matter what you do.
- Time Saver: If you don’t like to plan multiple times throughout the week, this method alleviates that. Get everything down in both your planner and your Google Calendar in one night, and then you’re done. That means more time to do other things, like playing with your dog or learning how to build a time machine.

Tip #3: Rocketbook by Day, Google Cal by Night
If you do most of your planning during the day and on the go, and if you’re more inclined to write things down with pen and paper first, then this third tip is the way to go.
- Carry your planner with you at all times of the day, and write down any plans that come up directly in the planner. These plans could be for tomorrow, or they could be for 3 months from now–either way, write it in your planner for safekeeping.
- Each evening, copy over all the written plans into Google Calendar. Yes, it really is that easy. The ol’ bait and switch. Except without the “bait”…and more of a “transfer” than a “switch”.
Benefits of Tip #3
- School Friendly: This tip is perfect for students because you can have your planner in all of your classes or lectures. Add homework assignments, club meetings, and study sessions to the planner all day and then transfer everything to GCal when you’re home at night.
- Pen and Paper First, Digital Second: This tip is ideal if writing things down first comes naturally to you, but you still need the information to be available to you digitally. That’s kind of the whole point of Rocketbook, actually–things are really coming full circle over here.

WARNING: The following extreme tip is recommended for pro users only, so don’t try this at home unless you’re a Rocketbook/planning/scheming/Google Calendar-ing expert.
Pro Tip: Rocketbook + IFTTT= Google Calendar
There’s an app called “If This, Then That” (we’ll refer to it as IFTTT) that creates “applets” to connect the Rocketbook app to your Google Calendar.
After setting up your IFTTT applet, any scan sent from the Rocketbook app to a (designated) Google Drive folder will automatically create an event in your Google Calendar. Like magic, but without the smoke and rabbits.
There’s a few things you should do before you start the steps to set up the connection:
- Create a folder in your Google Drive that’s specifically for calendar items you’ll be scanning from the Rocketbook app that you want to be sent directly to Google Calendar. Name it anything you want, but something like “GCal Events from Rocketbook” is a decent pick.
- Set up a destination to this specific Google Drive folder within the Rocketbook app. This is the destination you’ll use whenever you want to scan and add something to your Google Calendar.
Here’s the steps for how to set this up using the IFTTT app:
- Download the IFTTT app (available on both the App Store and Google Play).
- After creating an account in(or signing into) the IFTTT app, tap Create in the bottom left to create a new applet.
- Tap If This to start building out the trigger. Under Choose a service, tap Google Drive.
- Under Choose a trigger, tap the first option, New file in your folder. (You may need to then tap Connect and sign into your Google account. Use the account for the Google Drive you’ll want to connect.)
- Type in the path of the special folder you’ve already created in your Google Drive for calendar items from Rocketbook. This should look something like Documents/2022/GCal Events from Rocketbook. Then, hit continue.
- Tap the Then That button that shows up on the next screen.
- On the Choose a service page, tap Google Calendar. Next, tap Quick Add Event. (You may need to tap Connect and sign into your Google account. Use the account for the Google Calendar you’ll want to connect.)
- Under Which Calendar? select the desired Google Calendar you’d like all events to be sent to. Under Quick Add Text, delete everything except for Filename.
- Hit Create action on the bottom, and when you’re brought back to the page that shows your trigger flow, hit Continue.
- Then, you’ll be brought to a Review and Finish page that should show you a summary of the path you created that will sound something like this:
If Documents/2022/GCal Events from Rocketbook, then quick add event to Work Calendar.
9. Tap Finish, and you’re set up!
Time to Scan!
- Grab your Rocketbook planner and write down the title of the event on a page, followed by the date and time frame (written in military time) of the event, like this: Dr. Spock Appt March 15 0900–1100
- Make it a Smart Title! Put ## before and after all of the text to make the whole thing a Smart Title, like this: ## Dr. Spock Appointment March 15 0900–1100 ##
- Scan the text with the Rocketbook app and send it to the Google Folder destination you set up–the same one that’s included in the trigger sequence in IFTTT.
- Open your Google Calendar and look at the new event that was just created–and that’s it!
So…will the Rocketbook app ever sync with Google Calendar?
Many of our users have asked for this, and it’s something we hope to offer! Our app team is hard at work and hope to develop this integration fully in the near future. We appreciate the feedback, and if you’re passionate about this potential feature, we encourage you to upvote (or submit any other ideas) to the ideas.getrocketbook.com submission page for our product team to consider.
If you don’t have a Rocketbook planner to use with your Google Calendar yet, check out the minimalist Everyday Planner.
Happy planning!


