Posted By Beth Cubbage on July 6, 2018
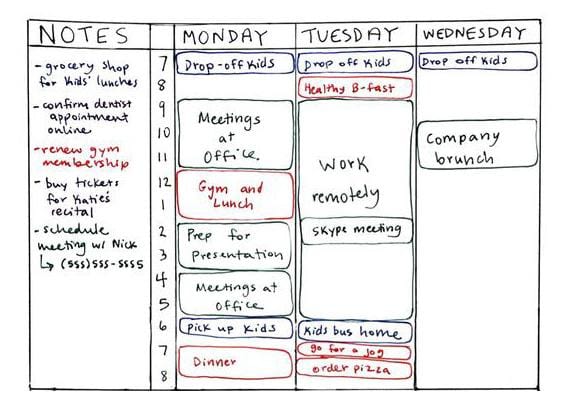
Time blocking is a way to organize your day using time slots. Instead of making to-do lists, time blocking allows you to designate a certain amount of time throughout your day to each task you need complete! Using colored Pilot Frixion pens and just two pages in your notebook, you can plan out your week and drastically increase your productivity. Follow these ideas to get started with time blocking.
Create a Weekly Grid
First, create a weekly grid in your Rocketbook. I suggest putting the grid either on the first or last two side-by-side pages. Putting your weekly calendar at the beginning or end will make it easy to find, and using two side-by-side pages allows you to see your whole week without turning the page.
Using a ruler to draw vertical lines, make columns for Monday, Tuesday and Wednesday on the left-hand page. On the right-hand page, make columns for Thursday and Friday. I suggest using the final column on the far right for Saturday and Sunday since the weekend is typically less busy. Just draw a horizontal line about halfway down the page to split the column into two days.
If you’re ready to make your planner permanent, you can draw the grid with a permanent marker. That way, the grid won’t be erased when you erase your schedule at the end of the week. If you’re not quite ready to commit (no judgement!), you can always try it out for a few weeks by making the grid with your Pilot Frixion Pens. Just be careful when you erase!

Choose a Color Scheme
Get a package of colored Pilot Frixion pens! Then, decide on categories for your time blocking. I have categories for home, work, blog, health, and planning. Once you have your list of categories (try not to exceed 5-6 categories), choose a color for each. Write down the color code in the bottom right-hand corner of your planner so you don’t forget it!
Commit to a Cadence
To make time blocking work, commit to a regular cadence of reviewing your schedule and to-do list, then blocking your time. You may want to play around with this to figure out your preference. It may work best to outline the major items for the entire week on Monday morning. This allows you to look ahead a few days. You can reschedule any conflicting meetings and cancel redundant appointments. If there’s something that you need to plan for, like a presentation you’ll be giving later in the week, you’ll have plenty of time to prepare.
Every morning, fill in the time around appointments and meetings based on your to-do list for the day. This is incredibly helpful because it makes the transition from meetings to other tasks so seamless. You can be much more productive and virtually eliminate wasted time.
Every evening, do a quick review of the next day to make sure you have what you need. For example, if you’re working from home or attending an off-site meeting the next day you’ll need to make sure to bring your laptop and water bottle with you.
Why is Rocketbook Ideal for Time Blocking?
If you want to try time-blocking, your Rocketbook is ideal for the task! It’s not bulky like a paper planner. It’s always with you for note-taking, so you don’t have to carry around another item. We know you like to travel light! Your Rocketbook is totally reusable and you can upload your weekly plan to the cloud, unlike traditional paper planners. Best of all, you can also customize your planner layout so it looks exactly like you want it to. That’s priceless!
Beth Cubbage is a consulting manager at a software company and mom to two girls. Beth has a PhD in Economics, which she uses to design various incentive programs for her kids’ bedtime (still working on that). When she isn’t wrangling work projects or family activities, Beth writes about career, productivity, and parenting at ParentLightly.com. In her (very) spare time, Beth enjoys mountain biking, martial arts, and obstacle races. Beth's Rocketbook Everlast helps keep her sane.


2 comments
An answer Madisson’s comment would be great as the same thing happened to me.
I tried making this template permanent like the article suggested and when I wipe the page down with water the permanent marker bleeds and stains the page orange? Why is this happening?